%20Text%20(Violet).png)
Editor's note: This post was originally released in May 2023 and has been updated to make it relevant for students preparing for Paper 1 exams in 2024.
Dear PE student,
Firstly, thank you for visiting this page. I expect your teacher has suggested you read it or, perhaps, you have found it in a scramble to prepare yourself for your GCSE PE Paper 1 exam. Well, you’re in the right place. Phew!
I am aware that you may want quick information, so I’m going to get to it fast. You will find below a series of resources and suggestions of what to use in these last few days to prepare for your exam. You can be selective… take what you need the most and be reassured that all of these resources are completely free. Furthermore, I am providing details for each individual course so ensure that you choose the course that is relevant to you.
So, let’s get started!
Step 1: Know your PE exam and focus your revision!
Please, visit the links below and get hold of my exam infographics along with lots of other great revision resources, including live PE and Sport Youtube videos, mock exam papers and model answers. Each one is detailed exactly for your specific exam.
- AQA GCSE PE Paper 1 (and 2) infographic
- Edexcel GCSE PE Paper 1 (and 2) infographic
- OCR GCSE PE Paper 1 (and 2) infographic
- WJEC GCSE PE exam infographic
- CIE IGCSE PE exam infographic
Importantly, these infographics detail both the commonly assessed topics but also the most important skills for your specific exam. Study these patterns and then make the decisions that follow.
Complete this table for your course:

Whilst no teacher should ever encourage you to only revise some of the course, the details that you have noted above will help you focus on the most crucial things in the days before your exam.
Step 2: Look over/study/answer the National Mock Exam in PE!
In January 2024, I released a mock exam paper for each of the GCSE PE exams. I wrote these exams based on the most up-to-date data available from each exam board. Therefore, these papers are an exemplary preparation for your real exam. I want to be clear here: these papers are not predictions of the actual summer 2024 PE exams. However, they are based, exactly, on the skills, content and mark distribution patterns of your course. Therefore, there is literally nothing better that you can use to familiarise yourself with what is to come.
- AQA GCSE PE National Mock Exam 2024
- Edexcel GCSE PE National Mock Exam 2024
- OCR GCSE PE National Mock Exam 2024
- WJEC GCSE PE National Mock Exam 2024
- IGCSE PE National Mock Exam 2024
You may find yourself with too little time to answer the whole thing. If so, don’t panic. Instead, study the paper, get a sense of your own strengths and weaknesses and then move on to step 3.
Step 3: Learn The EverLearner's model answers for your PE exam
Even if you haven’t answered the mock exam yourself, you can learn the model answers that we have written for each and every question. Let me be clear:
- AQA GCSE PE National Mock Exam Model Answers 2024
- Edexcel GCSE PE National Mock Exam Model Answers 2024
- OCR GCSE PE National Mock Exam Model Answers 2024
- WJEC GCSE PE National Mock Exam Model Answers 2024
- IGCSE PE National Mock Exam Model Answers 2024
The keywords within the model answers need to be the same ones that you use in your exam responses. Yes, you need to do this in context but learning the model answers and the keywords included will get you credit. USE THEM!
If you want a fuller set of keywords, you can also study the National Mock Exam mark schemes from below. These include all of the key phrases that were worthy of marks in the National Mock Exams:
- AQA GCSE PE National Mock Exam Mark Schemes 2024
- Edexcel GCSE PE National Mock Exam Mark Schemes 2024
- OCR GCSE PE National Mock Exam Mark Schemes 2024
- WJEC GCSE PE National Mock Exam Mark Schemes 2024
- IGCSE PE National Mock Exam Mark Schemes 2024
Step 4: Upskill yourself - fine tune your PE exam technique
This step actually has two sub-steps. I want you to think about two skills that your exam requires.
Step 4.1: Practical examples
All of you, regardless of exam board, need to be able to apply your knowledge to practical and/or movement examples. This is often referred to as the AO2 or application skill. The problem is that most students don’t do it very well. So, in the last few days and hours before your exam, I want you to quickly learn the E-I-O model. Now, if you learn this well and use this model in your exam, you will be picking up marks in the exact areas where other students tend to lose them. In other words: you will have a major advantage on average, compared to other students.
This is how to do it:

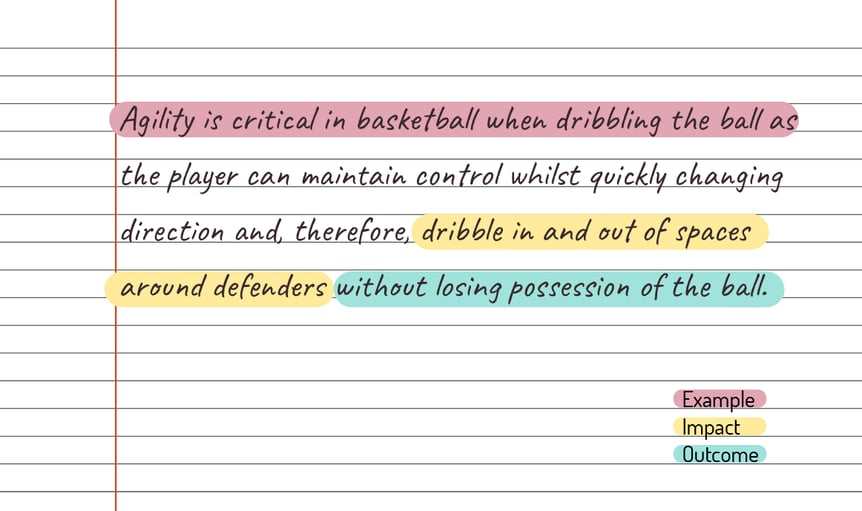
Can you see the pattern above? Rather than simply stating that agility is used when dribbling in basketball, the student has applied the E-I-O model with the dribbling in basketball as the example (E), moving into and out of spaces and defenders as the impact (I), and without losing possession as the outcome (O).
If you are able to do this consistently across your exam, you will earn many more marks than those who don’t and – let me tell you – most students don’t! Therefore, this is a no-brainer for you.
If you want more examples of the E-I-O model, please visit my blog posts...
- 100 Practical Examples in PE Part 1
- 100 Practical Examples in PE Part 2
- 100 Practical Examples in PE Part 3
Step 4.2: Know what commands mean
It is absolutely essential that you know the difference between command skills such as “Describe” and “Explain” or such as “Evaluate” and “Analyse”. If you don’t, you will miss out on marks that you could have scored. Once again, the model answers from the National Mock Exams will emphasise these skills but I also want to simplify things for you below:
"Describe" Language
When describing, say what it is, what it is like, what it has or what it doesn’t have.
Language used:
- ...is characterised by...
- ...is composed of...
- ...is like...
- ...is not like...
- The features are...
- ...has...
- ...does not have...
- ...contains...
- ...does not contain...
"Explain" language
When explaining, say how or why it happens. These words mean you are explaining.
Language used:
- The reason for this...
- ...because...
- As a result...
- This means...
- ...through...
- ...by...
- Therefore,
"Evaluate" language
When evaluating, state what strengths and weaknesses or advantages and disadvantages there are and then reach a conclusion.
Language used:
- A strength...
- A weakness...
- An advantage...
- A disadvantage...
- On the one hand...
- On the other hand...
- Whereas...
- In contrast,
- The upside is...
- The downside is...
"Analyse" language
When analysing♦, break the idea/image/graph into parts and explain each one in turn.
Language used:
- Firstly,
- Secondly,
- Lastly,
- The reason for this...
- ...because...
- As a result...
- This means...
- ...through...
- ...by...
- Therefore,
♦OCR use the command “Analyse” differently to the other exam boards. OCR students need to use evaluating language for both “Evaluate” and “Analyse” commands.
There are many other commands that you need to know but these ones will help you a great deal in the days and hours before your exam. If you would specifically like to know how to use these skills in extended writing, visit our blog post, "Extended Writing in GCSE PE Exams".
Step 5: Watch my live PE revision sessions and use our notes pages
So, everything so far has been leading to here. I very strongly recommend that you visit the relevant revision hub page and take the live revision sessions that we have already broadcast. These sessions are all in the region of one hour in length and are extremely relevant to your course and your exam.
Most importantly, take the session in combination with the notes pages that we have provided. These notes can be downloaded and printed from the hub page and are perfect for completing alongside the session. Once done, learn the notes!
- AQA GCSE PE live revision hub page
- Edexcel GCSE PE live revision hub page
- OCR GCSE PE live revision hub page
- WJEC GCSE PE live revision hub page
- CIE IGCSE PE live revision hub page
The hub pages also contain all of the infographics, exam papers, model answers and mark schemes previously mentioned. USE THEM!
So, there you have it: five steps that any and all students can take in the final days and hours before their exam. I want you to know that I am so confident in these resources that I use them with my own students and my own children. I, therefore, endorse these steps for you.
Enjoy and go to it!!